Want to know how to line a baseball field? You can achieve perfect lines every time by understanding baseball field dimensions, using the right tools, applying proper field layout techniques, and performing regular baseball field maintenance. This guide will walk you through each step for professional-looking baseball field marking.
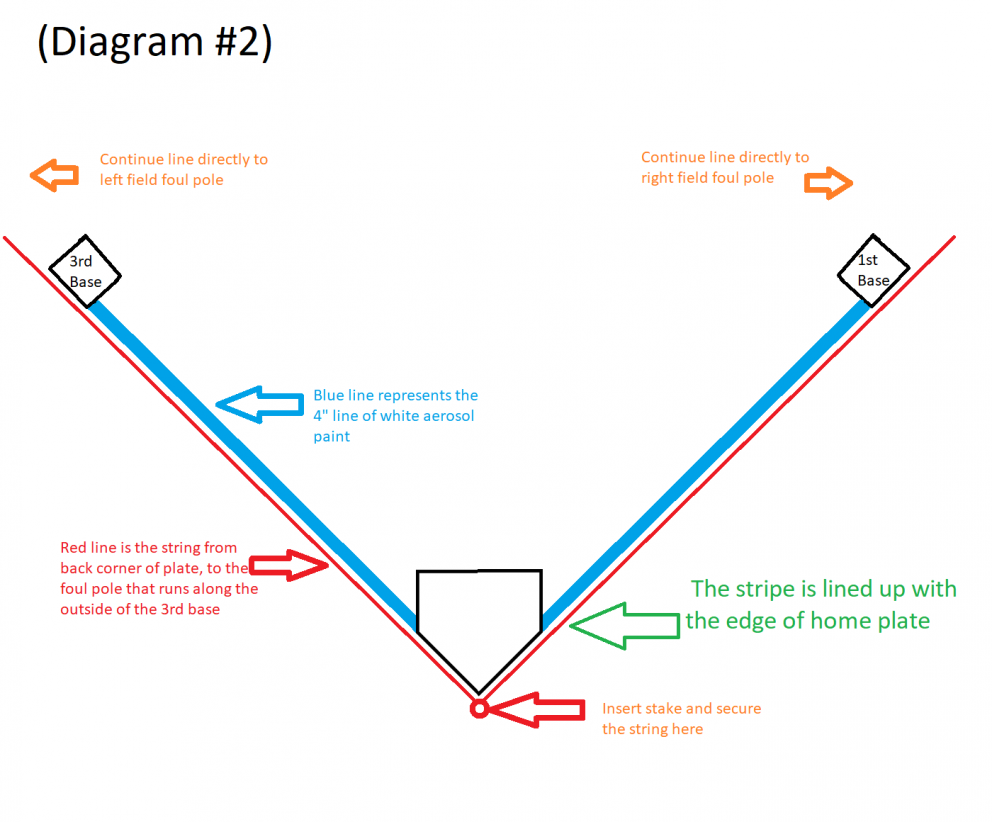
Image Source: foxvalleypaint.com
Why Accurate Baseball Field Marking Matters
A well-lined baseball field is more than just aesthetically pleasing. It’s crucial for:
- Fair Play: Clear lines ensure fair calls and prevent disputes.
- Safety: Properly marked base paths and batter’s boxes enhance player safety.
- Professionalism: A sharp-looking field reflects pride in the program.
- Game Flow: Well-defined lines help the game run smoothly.
Tools & Materials for Chalking Baseball Field
Before you begin, gather the necessary tools and materials:
- Measuring Tape: A 100-foot or longer measuring tape is essential.
- String Line: Use durable string for straight lines.
- Line Marker: Choose a reliable line marker that distributes chalk evenly.
- Chalk or Field Marking Paint: Select a high-quality chalk or paint designed for baseball fields.
- Layout Tools: A batter’s box template, home plate template, and base anchors are helpful.
- Gloves: Protect your hands from chalk and paint.
- Rake: For smoothing the infield surface before marking.
- Wheelbarrow or Cart: To transport chalk/paint.
Choosing the Right Chalk or Paint
- Chalk: Economical and easy to apply, but less durable than paint. Ideal for temporary marking or fields with frequent use. Look for a high-quality calcined clay chalk that is less dusty.
- Field Marking Paint: Provides brighter, longer-lasting lines. Best for professional fields or those with less frequent maintenance. Choose a paint specifically designed for grass and clay surfaces. Water-based paints are easier to clean up.
Types of Line Markers
| Type | Description | Pros | Cons | Best For |
|---|---|---|---|---|
| Drop Spreader | A simple device that drops chalk onto the field. | Inexpensive, easy to use. | Can create uneven lines, requires more chalk. | Budget-conscious teams, infrequent lining. |
| Wheel Applicator | Applies chalk through a wheel-driven system. | Creates more consistent lines than drop spreaders, less chalk wastage. | Requires more maintenance than drop spreaders, may struggle on uneven surfaces. | Recreational leagues, well-maintained fields. |
| Spray Marker | Sprays paint or chalk solution through a nozzle. | Produces sharp, professional-looking lines, efficient use of paint/chalk. | More expensive than other types, requires proper cleaning and maintenance, can be affected by wind. | Professional fields, high-traffic areas. |
| Battery-Powered Marker | Uses a battery to power the application of paint or chalk, often with adjustable settings. | Consistent lines, reduces physical exertion, customizable settings for line width and flow. | More expensive, requires battery maintenance, can be heavier than manual markers. | Fields requiring frequent lining, varied conditions. |
Baseball Field Dimensions: Key Measurements
Accurate baseball field dimensions are essential for proper layout. Here are the standard measurements:
- Distance Between Bases: 90 feet
- Pitching Distance (Mound to Home Plate):
- Major League Baseball: 60 feet 6 inches
- High School/College: 60 feet 6 inches
- Youth (13-14 years): 60 feet 6 inches
- Youth (11-12 years): 50 feet
- Youth (9-10 years): 46 feet
- Youth (8 years and under): 40-46 feet (check local league rules)
- Home Plate: 17 inches wide
- Batter’s Box: 4 feet wide, 6 feet long
- Catcher’s Box: 8 feet wide, extending 4 feet behind home plate.
- First Base: 15 inches x 15 inches
- Second Base: 15 inches x 15 inches
- Third Base: 15 inches x 15 inches
Note: Field dimensions can vary for different age groups and levels of play. Always consult your league’s official rules for specific requirements.
Field Layout Techniques: Step-by-Step
Here’s a detailed guide to laying out your baseball field:
Step 1: Locating Home Plate
- Find the Center: Determine the desired location for home plate. This will be your starting point.
- Mark Home Plate: Use a home plate template or measuring tape to mark the location of home plate. Secure it with stakes.
Step 2: Establishing the Baseline
- Measure to First Base: Measure 90 feet from the center of home plate towards first base. Use your measuring tape and mark the point where first base will be located.
- Measure to Third Base: Measure 90 feet from the center of home plate toward third base. Mark the point where third base will be located.
- Check for Square: Verify that the angle between the lines from home plate to first and third base is 90 degrees. Use the 3-4-5 method (explained below) for accuracy.
- Anchor the Bases: Place base anchors at the marked locations for first and third base.
Step 3: Squaring the Infield (Using the 3-4-5 Method)
The 3-4-5 method ensures a perfectly square infield.
- Measure 30 Feet: Measure 30 feet along the line from home plate to third base and mark this point.
- Measure 40 Feet: Measure 40 feet along the line from home plate to first base and mark this point.
- Measure Between Points: The distance between the two points should be exactly 50 feet if the angle is square. Adjust the position of first or third base until this measurement is accurate.
Step 4: Locating Second Base
- Measure from First Base: Measure 90 feet from first base towards second base.
- Measure from Third Base: Measure 90 feet from third base towards second base.
- Intersection: The point where these two measurements intersect is the location of second base. Secure the base anchor.
Step 5: Establishing the Pitching Mound
- Measure from Home Plate: Measure the appropriate pitching distance (e.g., 60 feet 6 inches for high school/college) from the center of home plate along the line to second base.
- Mark the Pitching Rubber: Place the pitching rubber at this point. The front edge of the rubber should be at the measured distance.
Step 6: Marking the Batter’s Box and Catcher’s Box
- Batter’s Box: Use a batter’s box template or measuring tape to mark the batter’s boxes on either side of home plate. The batter’s box is 4 feet wide and 6 feet long. The back of the batter’s box is 6 inches from the point of home plate.
- Catcher’s Box: The catcher’s box is 8 feet wide and extends 4 feet behind home plate.
Drawing Baseball Field Lines: Techniques for Crisp Lines
Now that the layout is complete, it’s time to start drawing the lines:
- Prepare the Surface: Rake the infield surface to remove any loose dirt or debris. This will help the chalk adhere better.
- Stretch String Lines: Use string lines to guide your line marker. Secure the string tightly between the base anchors.
- Apply Chalk/Paint: Carefully follow the string lines with your line marker, ensuring a consistent and even application of chalk or paint.
- Check for Straightness: After applying the lines, double-check for straightness. Make any necessary corrections.
- Mark Foul Lines: Extend the foul lines from home plate through first and third base, using a string line and chalk/paint.
- Base Paths: Mark a three-foot line on either side of a direct line from each base to create the running lane.
Tips for Perfect Lines
- Use a High-Quality Line Marker: A good line marker will distribute chalk or paint evenly and consistently.
- Keep the Line Marker Clean: Regularly clean your line marker to prevent clogs and ensure smooth operation.
- Apply Chalk/Paint in Light Coats: Multiple light coats are better than one heavy coat, which can result in uneven lines.
- Walk at a Steady Pace: Maintain a consistent pace while applying chalk/paint to ensure even coverage.
- Check Your Work Frequently: Stop periodically to check the straightness and consistency of your lines.
Maintaining Baseball Field Lines
Regular baseball field maintenance is essential for keeping your lines looking sharp:
- Re-Chalk/Paint Regularly: Re-chalk or paint lines as needed, depending on usage and weather conditions. High-traffic areas may require more frequent maintenance.
- Repair Damaged Areas: Repair any damaged areas of the lines immediately.
- Keep the Infield Clean: Remove any debris or vegetation that can obscure the lines.
- Drag the Infield: Regularly drag the infield to maintain a smooth and even surface.
- Water the Infield: Water the infield to help the chalk or paint adhere better.
- Proper Storage: Store chalk/paint and equipment properly to prevent damage and extend their lifespan.
Baseball Field Striping: Adding Visual Appeal
Baseball field striping involves creating patterns in the grass using mowing techniques. This can add visual appeal and a professional touch to your field.
- Use a Reel Mower: Reel mowers provide the cleanest cut and are best for creating stripes.
- Alternate Mowing Directions: Mow in alternating directions to create light and dark stripes.
- Plan Your Pattern: Plan your striping pattern in advance to ensure a consistent and professional look.
Fathoming the Significance of Base Path Marking
Clear base path marking is crucial for player safety and fair play. The base path is the direct line between bases, plus three feet on either side.
Base Path Marking Tips
- Use a Different Color: Consider using a different color chalk or paint for the base path to make it more visible.
- Maintain Consistent Width: Ensure the base path lines are consistently three feet wide.
- Re-Mark Frequently: Base paths are subject to heavy wear and tear, so re-mark them frequently.
FAQ: Your Questions Answered
-
What is the best type of chalk to use for baseball field marking?
High-quality calcined clay chalk is the best choice. It is less dusty and provides good visibility.
* Can I use paint on a grass infield?Yes, you can use paint specifically designed for grass. Look for water-based paints that are safe for grass and easy to clean up.
* How often should I re-chalk my baseball field?The frequency depends on usage and weather conditions. High-traffic areas may need to be re-chalked after each game, while other areas may only need it once a week.
* What is the 3-4-5 method for squaring a baseball field?The 3-4-5 method is a simple way to ensure a perfectly square infield. It involves measuring 30 feet along one baseline, 40 feet along the other, and ensuring that the distance between the two points is 50 feet.
* Who is responsible for maintaining baseball field lines?The responsibility for maintaining baseball field lines typically falls to groundskeepers, coaches, or volunteers, depending on the level of play and the resources available.
* What tools do I need for proper baseball field maintenance?Essential tools include a rake, line marker, measuring tape, string, chalk or paint, and a drag mat.
* How do I fix uneven lines?Use a rake or broom to smooth out the existing line, then reapply the chalk or paint carefully.
* What are the standard dimensions for a youth baseball field?Youth baseball field dimensions vary depending on the age group. Consult your league’s official rules for specific requirements.
* How can I make my baseball field lines last longer?Use high-quality chalk or paint, apply it in light coats, and perform regular maintenance to repair damaged areas.
* What is the purpose of the catcher’s box?The catcher’s box defines the area where the catcher must remain while the pitcher is delivering the ball.
* Can I use a garden hose to mark lines?No, a garden hose will not create straight, even lines. Use a proper line marker and string lines for best results.
* What is the best time of day to chalk a baseball field?Early morning or late afternoon is ideal, as the sun is less intense and the chalk or paint will dry more evenly. Avoid chalking on windy days.
By following these steps and tips, you can achieve perfect baseball field lines every time. Proper baseball field maintenance ensures a safe, fair, and professional-looking playing surface. Good luck!
Hi, I’m Sean Kernan, the mind behind darkviolet-cobra-206266.hostingersite.com!! As a passionate sports enthusiast, I created this platform to share my experiences and insights about the dynamic world of sports. From in-depth analysis to personal stories, I aim to bring you closer to the game and inspire a deeper love for sports. Join me as we navigate this exciting journey together!